Tuesday, November 6, 2012

Ultimate Periscope (Periscope Ver. 2)

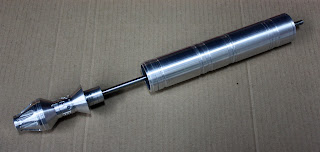
Just received my new super-awesome Ultimate Periscope from super-awesome club member Michael Wheeler. Beautiful work as always!

Ultimate Periscope and Riser 2012

Below is a comparison between Michael's 2011 version and his new Ultimate periscope. you can see the housing is a bit wider and a bit shorter in the rear, but overall remains very similar. The Periscope also has a few improvements like improved lens retention tapped hole and an optional magnetic pie panel holder. The riser has some major improvements and is extremely screen accurate.

Periscope vs. Ultimate Periscope... Who will Win???


The structure shaft is hollow. (now you can run all your power and programming wires much easier), Instead of O-Rings it has a rubber boot with the spiral pattern. The boot disk floats on top of the rubber boot so you have something to play with and the connector clips have details most people have never seen.

Friday, November 2, 2012

Dome Drive 2.0 - Phase One

Seeing as how I have this lovely new Base Plate... I decided to get to work on Dome Drive "2.0" - I'll be removing the 3.25" Dome Drive Wheel and replacing it with the A&A Geared Dome Ring.

Phase One was to "fix" the Rockler Bearing.

I decided to remove the sluggish greasy grindy loud steel ball bearings and replace them with Teflon coated White Delrin Acetal Resin Ball Bearings.

First I removed the Dome to get at and remove the Rockler Bearing.  Once on my bench, I first removed the small set screw on the side of the bearing.


Bearing Set Screw Removed

Holding the Bearing vertically (Careful! Bearings will start falling out of this hole!) over an empty container I began to spin the bearing and 153 greasy ball bearings spilled out... rather easily however.  You can see the screw here... I also made a small mark with a sharpie on the screw head so I could put it back exactly where it was.


153 Steel Ball Bearings


Once I had the ball bearings removed, the two halves came right apart.  the bearing was loaded with thick lubricating grease, which had to be removed.


I simply used paper towels to wipe the bearing clean. Once the grease was removed, I went ahead and cleaned the bearing with a light spray of WD-40 on a clean rag, making sure I had a nice smooth surface.

Grease Removed and Bearing Cleaned.

Once I had the bearing cleaned up, it was time to install the plastic ball bearings. These are  White Delrin Acetal Resin Ball Bearings in 5/16" diameter.  These come in packs of 100 so I went ahead and bought two so I was sure to have enough.


DuPont Teflon White Lithium Grease & Teflon Silicone Lubricant


First I coated the inner track of the bearing with Teflon White Lithium Grease. Not a lot... just a nice even layer... enough to coat the entire track.  Under the weight of a heavy wooden loaded Lazy Susan, lots of thick lubricating grease is fine... However the aluminum dome is not as heavy and rotation was actually impeded by the heavily greased ball bearings.

White Delrin ® Acetal Resin Balls, 5/16" Diameter

Next, I took 153 of the plastic ball bearings and placed them in a disposable Tupperware container and gave them a light bath in Teflon Silicone Lubricant.  I laid the Bearing flat on my bench, and carefully installed the plastic ball bearings back through the installation hole. Once I was done, I replaced the side screw and tested my new, "improved" Rockler Bearing.

The result?  A dramatic improvement, I have to say!  I'm super happy with the result... about a 400% improvement, by my super-scientific calculation... :oP ...and silky smooth!  R2's head has never spun better!  Not only is this a performance improvement but a fairly significant weight reduction as well...  the steel ball bearings weigh in at almost 1 pound (15.3 oz.) where the plastic bearings come in at a super-light 2.0 oz.!  More to follow...

Monday, October 29, 2012

Dome Base Plate (#6)


I also received a set of Dome Base Plates today from David "Steele" Smith, which included this gorgeous Blue Anodized Diet Dome Base Plate.

Aluminum Dome Base Plate - Blue Anodized


C6 R2 Passes

The bidding was fierce and it was down to the wire, but I scored this baby on eBay for a whopping... five dollars.  :o)

All I need is more R2 tchotchkes, but I just thought this one was cool. (Aren't they all?)

I have my Yoda 4 Day Adult pass from the con, but this one is way 'mo better, methinks. ;o)

CVI 4 Day Child's Pass

Sunday, October 28, 2012

Motivation...

After R2LA... I'm totally motivated to finally finish this build! (Can't you tell? I mean two posts in one day? C'mon!) Guess I just needed to recharge the ol' batt'ries!

Been working on the Skins lately... they still need a bit of re-work, then it's off to gluing and finally on to fitting!

Once I figured out how this Escher-esque puzzle went together, It's finally taking shape!

I'm pretty happy with they way they're turning out, but I still have a bit to do:

Many of the panels need to be re-formed to the body diameter of 18.174", as most of them are now bent out of shape.  Oh, what I'd give for a decent Roll Press right about now. :o)

Also, I'm using a COM-8 A Frame with the full size Rear Door Assembly (ANH style). I still need to cut the Rear Skins to fit... Time to bust out that new Dremel!

SKINS - FRONT

SKINS - REAR

R2LA 9

Recently my little R2 unit made the trek to the South-land and had his debut at the 9th Annual gathering of R2 Builders.

Had a lot of fun, met a lot of long-time club members and had a great time! Nice to finally put some faces to some names!

R2LA - 9.29.2012

R2's were "outshined" (get it?) by a few Wall-E's...


Sunday, June 24, 2012

No Updates...?

Anyone who has been following my blog may have noticed the general LACK of updates lately.

I've been pretty occupied getting all the electronics and such installed in my Droid, and I just haven't had the time to sit down and properly document the details.

As for the lack of updates, I think it's just my general dislike for all things "social networking" that keeps me from properly updating my blog.

However... some builders have indicated that my Blog has been somehow useful to them... (Thanks!) SO.... Stay tuned... updates are on the way!

Tuesday, March 27, 2012

Center Foot Issues

fig. 1
So I had a bit of a problem here.  I purchased this set of Center Foot Side Details (aka Half-Moons) from a now defunct parts supplier... turns out they didn't fit well. At all.


You can see in fig. 1, the top edges of the Moons should be parallel with floor, or 90 degrees from vertical. As you can see, these are not.  Turns out these are actually about 4 degrees off.

fig. 2

After a bit of work, I have a properly made set ...and now the Half-Moons look correct.  Still not perfect, but much, much better.  :o)

On to the Outer Feet!  (Yep... same problem.)

Monday, March 19, 2012

CPU Arm


Well, it's not much to see... yet, but it is ALUMINUM. I've been evaluating actuators to drive the CPU Arm - Right now I'm taking a good look at Firgelli Technologies L16 Series Actuators.

The L16's have larger motor for faster speeds and heavier loads.  Standard options include: three stroke lengths, three force/speed combinations(gear ratios), Choice of linear position feedback or end of stroke limit switches.

Here's a fine example on YouTube, from LePaul's Build:

R2-D2's CPU Arm and Glipper Claw Actuators in action